Summary
PLEASE NOTE:
This document is undergoing updates as we approach the Release Candidate stage of Open Elements 4.0 with iPay integration. Please note that certain information contained herein may be subject to change or incomplete at this juncture.
Open Elements comprises a collection of prebuilt user interface (UI) components meticulously crafted for facilitating the seamless creation of web checkout experiences. It stands as a pivotal feature encapsulated within OpenElements.js, our cornerstone JavaScript library tailored explicitly for the development of sophisticated payment processing workflows. Leveraging advanced encryption techniques, OpenElements.js adeptly tokenizes and safeguards sensitive payment information directly within its respective Element, mitigating any exposure to your server infrastructure.
How does it work?
The Open Elements JavaScript library seamlessly integrates with your existing elements within the checkout process, empowering the generation of secure payment elements and feature-rich components that augment the checkout experience.
Implementation of Open Elements is streamlined, requiring just a few lines of JavaScript code. Customization options abound, with the flexibility to tailor elements either directly through JavaScript or via configurations within the OpenPath Enterprise backoffice. Central to its functionality are three primary utilities: connect, attach and set, offering versatile solutions for seamlessly integrating with your checkout process.
To see it in action please see: Open Elements 4.0
Connect
The connect feature empowers seamless integration of the Open Elements JavaScript with pre-existing elements on your website essential for facilitating payment transactions. For instance, if your webpage includes input elements designated for consumer billing address details, connect allows effortless linkage of these elements to Open Elements, enabling automatic synchronization with any alterations made within these fields.
Example JS
let oe = new openElements('Mg2KYmzEEPn2Q4Kf', { total: 100, currency: "USD", orderId: 'order001' }); oe.connect({ billing: { address1: "billToAddress", address2: "billToAddress2", city: "billToCity", state: "billToState", postalCode: "billToZip", country: "bill-to-country", firstname: "billToFirstName", lastname: "billToLastName" } });Attach
The attach feature grants you the flexibility to designate specific locations within your checkout page for rendering Open Elements. These elements encompass a range of crucial components such as saved shipping addresses, saved billing addresses, payment entry fields, terms of service agreements, and the payment button. This capability empowers you to strategically position these elements according to your layout preferences, ensuring optimal placement and seamless integration with your checkout experience.
Example HTML
<div id="open-elements-shipping"></div> <div id="open-elements-form"></div> <div id="open-elements-terms"></div> <div id="open-elements-button"></div> <div id="open-elements-notification-div"></div>Example JS
oe.attach({ payment: 'open-elements-form', process: 'open-elements-button', shippingAddress: "open-elements-shipping", billingAddress: "open-elements-billing", terms: "open-elements-terms", notification: "open-elements-notification-div", });
Getting Started
In getting started we are assuming you already have an OpenPath account to attach the Open Payment Element to. If you do not currently have an OpenPath account, signup for a free account at:
OpenPath - Create FREE Account → https://client.openpath.io/create-account
Connecting to an OpenPath Site
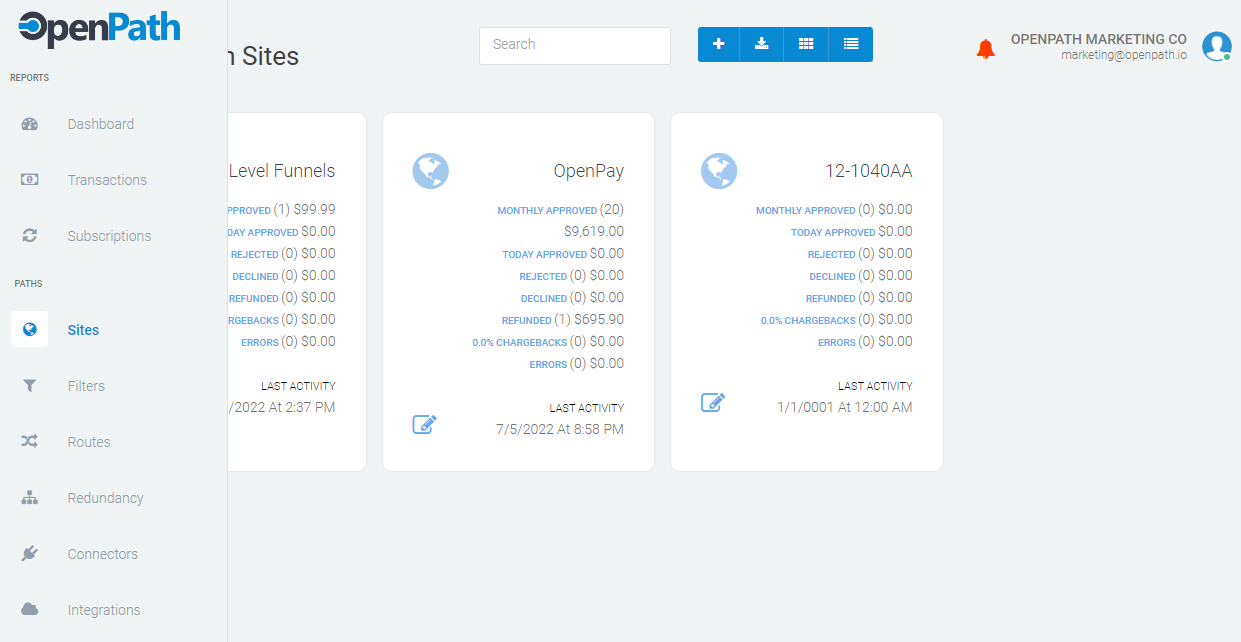
The first step in setting up your Open Payment Element is choosing an OpenPath site to connect the Element to. You can find you Sites by logging in to your Enterprise OpenPath account and navigating to Sites in the left menu.
Select the Site you want to connect to by clicking on the Edit icon in the left lower corner of the Site card you want to connect to.
Get the Public Key
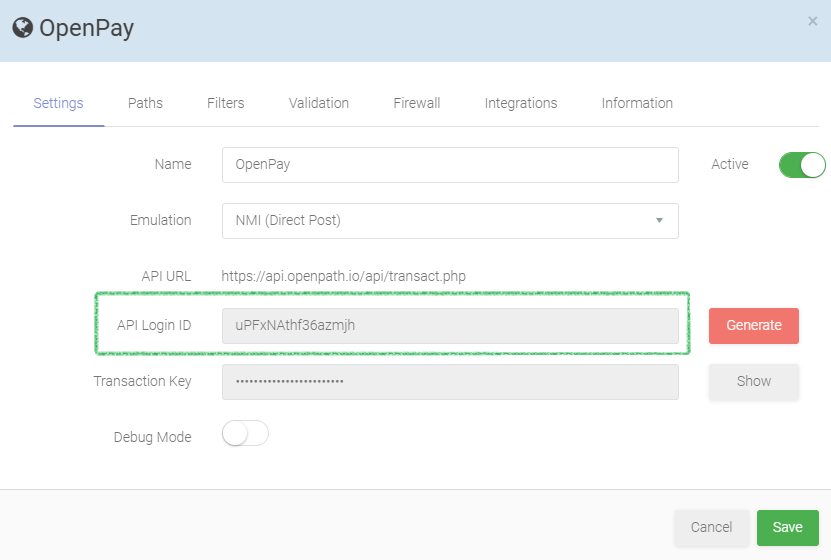
First you will need to take record of the API Login ID which is the Public Key you will need to use when initializing your Open Payment Element which can be found under the Settings tab in your Site.
Validate you Domain
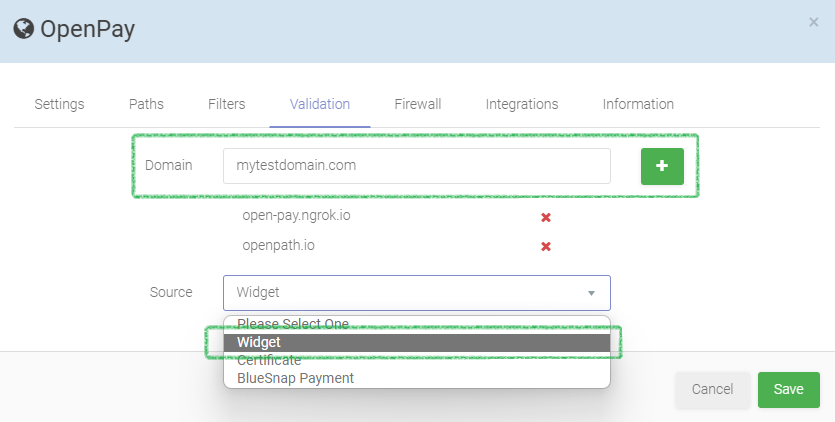
Second you will need to validate the domain you will be initializing from to do the final authorization and fingerprinting of the request. To do this navigate to your Validation tab in your Site, from the Source, make sure to select Widget and type the domain that will be initializing the Open Payment Element in the domain and click the + and then the Save.
Render the Element
One you’ve completed the validation steps you can now render your element on any page under that domain. The following is the simplest implementation of the element, which we will then build on in the following steps.
JavaScript Reference
Create a reference to the Open Payment Element JavaScript in the <HEAD> of your <HTML> document. Please note you can directly reference the version you are using, such as op-payment.1.0.0.js which will ensure breaking change updates will not affect your implementation. If you would like to always use the current version, you can also reference op-payment-current.js.
Code Example
<head> … <script src="https://asset.openpath.io/js/openpath/op-payment.1.0.0.js"></script> … </head>Create an Element to Attach
Next you have to have an element on your page that we can attach the Open Payment Element to, this can be any element with any ID or Class which can be attached to after initialization. In the example below we’ve created a div with an ID of op-payment-element.
Code Example
<div id="op-payment-element" style="width:400px;height:300px;"></div>Initialize the Open Payment Element
Once the script is loaded and there is an element to attach to, we can now initialize the Element. In order to initialize the Element, we will need to have acquired the Public Key and validated the domain in the previous steps for this to work correctly.
In the example below we are going to initiate the using the minimum requirements which are Public Key, Order ID and Total.
Code Example
let openElement = new Op.PaymentWidget('PUBLIC_KEY', { orderId: 'ORDER_ID', total: TRANSACTION_TOAL, });
Attach the Element
Now we attach and render the Open Payment Element with this final call.
openElement.attachPayment('#op-payment-element'); openElement.attachTerms('#op-terms-element'); openElement.attachShipping('#op-shipping-element'); openElement.attachButton('#op-button-element');As we can see from the above the JavaScript will create a promise, the promise is that if the transaction is approved, we will return the success results; however, if the transaction is declined, we will return the reason it was declined to the customer and allow them to try again with updated or new information.
[NEW] Initialize Elements
openElement.init().then( function (response) { // an approval promise that was create and you can do something with } );
Approved Response
{ responseId = // unique id about this response in the openpath system responseCode = // the standard mapped NMI emulation response responseText = // text representing the response from the gateway or processor paymentTransactionId = // the transaction ID returned from the gateway orderId = // the order id you assigned to this transaction paymentToken = // a payment token that can be used through the API to recharge the client successful = // was this transaction successfully processed }Handle the Response Promise
If the transaction is successfully processed, then the Approved Response Promise will fire and return some details of the transaction. You can use these values to reference the transaction in the OpenPath back office, issue Captures and Refunds or use the Payment Token to bill subsequent transactions for Trials or Subscriptions.
responseId : Response ID - A unique id about this response in the OpenPath system.
responseCode : Response Code - The standard mapped response from the payment gateway or processor.
responseText : Response Text - Human readable response text based on the Response Code.
paymentTransactionId : Payment Transaction ID - The transaction ID returned from the payment gateway or processor.
orderId : Order ID - The original Order ID supplied to OpenPath by the Merchant for this order.
paymentToken : Payment Token - A secured payment token that securely represents the payment method used that can be used to charge the customer again at a later time.
successful : Successful - Indicates if this transaction was successful or not.
Optional Actions After Payment
In order to take actions after the payment such as Capturing, Refunding or Rebilling you can either login to the OpenPath back office to perform these actions on the transactions or you can call the OpenPath Transaction API to perform these actions server side.
For more information on how to access the API, please refer to the following documentation:
Documentation - NMI Emulation – OpenPath, Inc. (zendesk.com)
Postman Examples - Emulation API Documentation (openpath.io)
Taking it Further
In the above steps, we took the steps for minimal functionality; however, for the best performance it is recommended you send the maximum data through the Element.
Additional Payment Methods
In order to accept more than Credit Cards and start accepting eChecks, you need to enable this through the element. You have the ability to enable eChecks or Disable Credit Cards during the construction of the Element as follows. The default behavior if no set is to show Credit Card payment method only.
let openElement = new Op.PaymentWidget('PUBLIC_KEY', { ... disableCreditCard: false, enableECheck: true, ... });Setting the Currency
By default, the Open Payment Element will process all payments as USD, if you want to process the payment in a different currency you can change it by applying the correct three letter ISO 4217 currency code during the initialization. For more information on the ISO codes, check the link below:
ISO - ISO 4217 — Currency codes
let openElement = new Op.PaymentWidget('PUBLIC_KEY', { ... currency: 'USD', ... });Add after declaration or initiation.
openElement.packet.currency('usd')Processing a Sale or Authorization
By default, the OpenPath Payment Element will process all payments as a Sale, which is both an Authorization and Capture at the same time; however, if you want to do an Authorization only, you can change that by setting the Payment Type attribute during initialization.
let openElement = new Op.PaymentWidget('PUBLIC_KEY', { ... paymentType: 'USD', ... });Adding Customer Information
During initialization you can also pass details about the customer using the customer object and customer attributes as follows.
let openElement = new Op.PaymentWidget('PUBLIC_KEY', { ... customer: { firstName: 'Jane' lastName: 'Doe', company: 'Northwind Inc', email: 'armstrong@example.com', phone: '5551231234', }, ... });Adding Shipping and Billing Information
You can add both either or both shipping information and billing information using the address attributes and the billing address object and shipping address object as follows.
let openElement = new Op.PaymentWidget('PUBLIC_KEY', { ... billingAddress: { address1: '200 Test Drive', city: 'Los Angeles', state: 'CA', country: 'US', postalCode: '123456' }, shippingAddress: { address1: '200 Test Drive', city: 'Los Angeles', state: 'CA', country: 'US', postalCode: '123456' }, ... });Adding Product Information
Finally on the information you can add to the Open Payment Element to be passed to the OpenPath platform is the products the customer is purchasing through the Line Items List as follows.
let openElement = new Op.PaymentWidget('PUBLIC_KEY', { ... lineItems: [ { productCode: 'SKU-100', description: 'Cool Widget', amount: 99.99, quantity: 1 }, { productCode: 'SKU-200', description: 'Cooler Widget', amount: 129.99, quantity: 1 }, ], ... });Customizing the Look and Feel
If you want to take the Open Payment Widget to another level by changing how it looks and feels you can also apply your own CSS stylings to the element as well by-passing custom styles or links to custom style sheets as follows.
let openElement = new Op.PaymentWidget('PUBLIC_KEY', { ... css: [ { type: 'style', cssText: '.op-cc-number{border-bottom:none;}', }, { type: 'link', href: 'https://example.com/path/to/file.css' } ] ... });Messaging
Developers Documentation
For further review please find the following link from our development team:
Open Payment Element – OpenPath, Inc. (zendesk.com)
Security
The current implementation of the Open Payment Element introduces serverless initiation, eliminating the necessity for backend calls between servers. This facilitates "codeless" implementations for the majority of websites, with the flexibility to seamlessly integrate more intricate data sets when required.
To enhance the serverless implementation, we've seamlessly integrated domain and fingerprinting technologies. This dual verification process ensures, firstly, that you have the authorization to generate the payment element and, secondly, that your fingerprint aligns with the initial request from the allowed domain.
See it in Action
OpenPath currently features a new BETA website exclusively crafted by our developers, designed for experimentation and exploration. Keep in mind, it's the developers' playground, so expect the unexpected. Nonetheless, it serves as an excellent resource to witness real-life examples of how Open Elements are implemented.
To checkout what is happening in the Playground go to:
For a basic Open Elements 3.0 implementation, checkout:
OpenPath Playground - Open Elements 3.0
...and for 3D Secure Transactions see:
OpenPath Playground - 3D Secure Open Elements 3.0
Getting Started
To begin, we assume that you already possess an OpenPath account to link with the Open Payment Element. If you haven't acquired an OpenPath account yet, you can sign up for a free account at:
OpenPath - Create FREE Account → https://client.openpath.io/create-account
Connecting to an OpenPath Site
To initiate the setup of your Open Payment Element, the initial step is selecting an OpenPath site to link the Element with. Locate your sites by logging into your Enterprise OpenPath account and accessing the "Sites" option in the left menu.
Get the Public Key
Initially, you must make note of the API Login ID, which serves as the Public Key required for initializing your Open Payment Element. You can locate this key under the Settings tab within your Site.
Validate you Domain
Next, it is crucial to validate the domain from which you will initialize for the final authorization and fingerprinting of the request. Navigate to the Validation tab within your Site. Under Source, select Widget, enter the domain that will be initializing the Open Payment Element in the designated field, click the "+" icon, and then proceed to save your settings.
Render the Element
Once you have successfully completed the validation steps, you can effortlessly render your element on any page within that domain. The subsequent section presents the most straightforward implementation of the element, laying the foundation for further enhancements in the subsequent steps.
JavaScript Reference
Establish a reference to the Open Payment Element JavaScript in the <HEAD> section of your <HTML> document. It's important to note that you can directly reference the specific version you are utilizing, like op-payment.1.0.0.js. This practice ensures that updates with breaking changes will not impact your implementation.
Code Example
<head>
  …
  <script src="https://checkout.openpath.io/js/op-payment.3.0.0.js" defer></script>
  …
</head>
Create Elements to Attach
Subsequently, you need elements on your page to which we can attach the Open Elements. This can be any element with any ID or Class, to which attachment can occur after initialization. In the example provided below, we have created a few DIV's for illustrative purposes.
Code Example
<div id="open-elements-form" style="width:auto;height:225px;"></div>
<div id="open-elements-threeds" style="width:auto;height:475px;display: none;"></div>
<div id="open-elements-button" style="width:auto;height:100px;"></div>
Initialize the Open Payment Element
Once the script is loaded and there is an element to attach to, we can now initialize the Element. In order to initialize the Element, we will need to have acquired the Public Key and validated the domain in the previous steps for this to work correctly.
In the example below we are going to initiate the using the minimum requirements which are Public Key, Order ID and Total.
Code Example
let openElement = new Op.PaymentWidget('PUBLIC_KEY', {
  orderId: 'ORDER_ID',
  total: TRANSACTION_TOAL,
});
Attach the Element
Now we attach and render the Open Payment Element with this final call.
openElement.attach('#op-payment-element').then(
  function (response) {

    // an approval promise that was create and you can do something with

  }
);
As we can see from the above the JavaScript will create a promise, the promise is that if the transaction is approved, we will return the success results; however, if the transaction is declined, we will return the reason it was declined to the customer and allow them to try again with updated or new information.
Approved Response
{
  responseId {integer}
  responseCode {integer}
  responseText {string}
  paymentTransactionId {string}
  orderId {string}
  paymentToken {string}
  successful {boolean}
}
Handle the Response Promise
If the transaction is successfully processed, then the Approved Response Promise will fire and return some details of the transaction. You can use these values to reference the transaction in the OpenPath back office, issue Captures and Refunds or use the Payment Token to bill subsequent transactions for Trials or Subscriptions.
responseId : Response ID - A unique id about this response in the OpenPath system.
responseCode : Response Code - The standard mapped response from the payment gateway or processor.
responseText : Response Text - Human readable response text based on the Response Code.
paymentTransactionId : Payment Transaction ID - The transaction ID returned from the payment gateway or processor.
orderId : Order ID - The original Order ID supplied to OpenPath by the Merchant for this order.
paymentToken : Payment Token - A secured payment token that securely represents the payment method used that can be used to charge the customer again at a later time.
successful : Successful - Indicates if this transaction was successful or not.
Optional Actions After Payment
In order to take actions after the payment such as Capturing, Refunding or Rebilling you can either login to the OpenPath back office to perform these actions on the transactions or you can call the OpenPath Transaction API to perform these actions server side.
For more information on how to access the API, please refer to the following documentation:
Documentation - NMI Emulation – OpenPath, Inc. (zendesk.com)
Postman Examples - Emulation API Documentation (openpath.io)
Taking it Further
In the above steps, we took the steps for minimal functionality; however, for the best performance it is recommended you send the maximum data through the Element.
Additional Payment Methods
In order to accept more than Credit Cards and start accepting eChecks, you need to enable this through the element. You have the ability to enable eChecks or Disable Credit Cards during the construction of the Element as follows. The default behavior if no set is to show Credit Card payment method only.
let openElement = new Op.PaymentWidget('PUBLIC_KEY', {
  ...
  disableCreditCard: false,
  enableECheck: true,
  ...
});
Setting the Currency
By default, the Open Payment Element will process all payments as USD, if you want to process the payment in a different currency you can change it by applying the correct three letter ISO 4217 currency code during the initialization. For more information on the ISO codes, check the link below:
ISO - ISO 4217 — Currency codes
let openElement = new Op.PaymentWidget('PUBLIC_KEY', {
  ...
  currency: 'USD',
  ...
});
Processing a Sale or Authorization
By default, the OpenPath Payment Element will process all payments as a Sale, which is both an Authorization and Capture at the same time; however, if you want to do an Authorization only, you can change that by setting the Payment Type attribute during initialization. Usable payment types: SALE AUTH
let openElement = new Op.PaymentWidget('PUBLIC_KEY', {
  ...
  paymentType: 'AUTH',
  ...
});
Adding Customer Information
During initialization you can also pass details about the customer using the customer object and customer attributes as follows.
let openElement = new Op.PaymentWidget('PUBLIC_KEY', {
  ...
  customer: {
    firstName: 'Jane'
    lastName: 'Doe',
    company: 'Northwind Inc',
    email: 'armstrong@example.com',
    phone: '5551231234',
  },
  ...
});
Adding Shipping and Billing Information
You can add both either or both shipping information and billing information using the address attributes and the billing address object and shipping address object as follows.
let openElement = new Op.PaymentWidget('PUBLIC_KEY', {
  ...
  billingAddress: {
    address1: '200 Test Drive',
    city: 'Los Angeles',
    state: 'CA',
    country: 'US',
    zip: '123456'
  },
  shippingAddress: {
    address1: '200 Test Drive',
    city: 'Los Angeles',
    state: 'CA',
    country: 'US',
    zip: '123456'
  },
  ...
});
Adding Product Information
Finally on the information you can add to the Open Payment Element to be passed to the OpenPath platform is the products the customer is purchasing through the Line Items List as follows.
let openElement = new Op.PaymentWidget('PUBLIC_KEY', {
  ...
  lineItems: [
    {
      productCode: 'SKU-100',
      description: 'Cool Widget',
      amount: 99.99,
      quantity: 1
    },
    {
      productCode: 'SKU-200',
      description: 'Cooler Widget',
      amount: 129.99,
      quantity: 1
    },
  ],
  ...
});
Customizing the Look and Feel
If you want to take the Open Payment Widget to another level by changing how it looks and feels you can also apply your own CSS stylings to the element as well by-passing custom styles or links to custom style sheets as follows.
let openElement = new Op.PaymentWidget('PUBLIC_KEY', {
  ...
  css: [
    {
      type: 'style',
      cssText: '.op-cc-number{border-bottom:none;}',
    },
    {
      type: 'link',
      href: 'https://example.com/path/to/file.css'
    }
  ]
  ...
});
Was this article helpful?
That’s Great!
Thank you for your feedback
Sorry! We couldn't be helpful
Thank you for your feedback
Feedback sent
We appreciate your effort and will try to fix the article